
GPT Image 2.5 for Fashion Photography: The In-Depth Review
When a new image model ships, the first week of opinions is mostly vibes. A few cherry-picked renders, a benchmark chart from the vendor, a hot take. That is not enough to decide which model renders a brand's entire catalogue.
So when GPT Image 2.5 arrived, Felix Wald on our team spent its launch week running it through the work our customers actually do on Brandmachine: dressing a model in a full outfit, reproducing knitwear, keeping brand lettering intact, and casting fashion models from a written brief. About 490 renders across five rounds of testing, with garment and text fidelity scored blind against the reference photographs.
This is a long article with a lot of images. If you only have a minute, here is the short version.
- At the same quality setting, GPT Image 2.5 costs €0.21 per image on Brandmachine against €0.70 for GPT Image 2, and it finished an on-model composite in 75 seconds instead of 133. On the hardest garment we tested, we could not find a quality difference between the two.
- The quality setting matters, but less than you would think. High is the right default. The cheapest setting is fine for composition previews and even for printed text, and it breaks detailed knit patterns.
- Printed and woven lettering survived every setting in 120 blind-scored renders. Repeating patterns such as fair-isle knits are where image models still struggle.
- Prompt following on faces is the biggest step up for us. A casting brief with a gap between the front teeth, dense freckles or near-white brows now comes back looking like the brief, and thirty briefs gave us thirty clearly different people.
- GPT Image 2.5 comes in two variants, Flare and Sunburst. They cost the same and scored the same. Flare is faster when generating from text only, and in launch week that advantage disappeared when editing photos. We default to Sunburst.
- Editing an edit still degrades an image after a handful of rounds, whatever the marketing says. Brandmachine avoids that by re-rendering from the source assets.
- There is still no true 4K. The largest portrait frame is 2480 x 3312 pixels.
Contents
- Price and speed
- Five quality settings, and which one to use
- Printed text survives everything. Knitwear is the hard case
- Casting: the prompt finally does what it says
- Flare or Sunburst
- Why revisions don't decay
- Smaller findings and technical limits
- How we tested
1. Price and speed
The fairest comparison is the same job at the same quality setting. We took a full outfit (a fair-isle pullover, a blazer, wide-leg trousers, loafers and sunglasses) and composed it onto the same generated model with both engines. Seven reference images per call: the model's portrait, her set card, and one front view of each garment. Output at 2480 x 3312 pixels, quality setting High, five renders each.
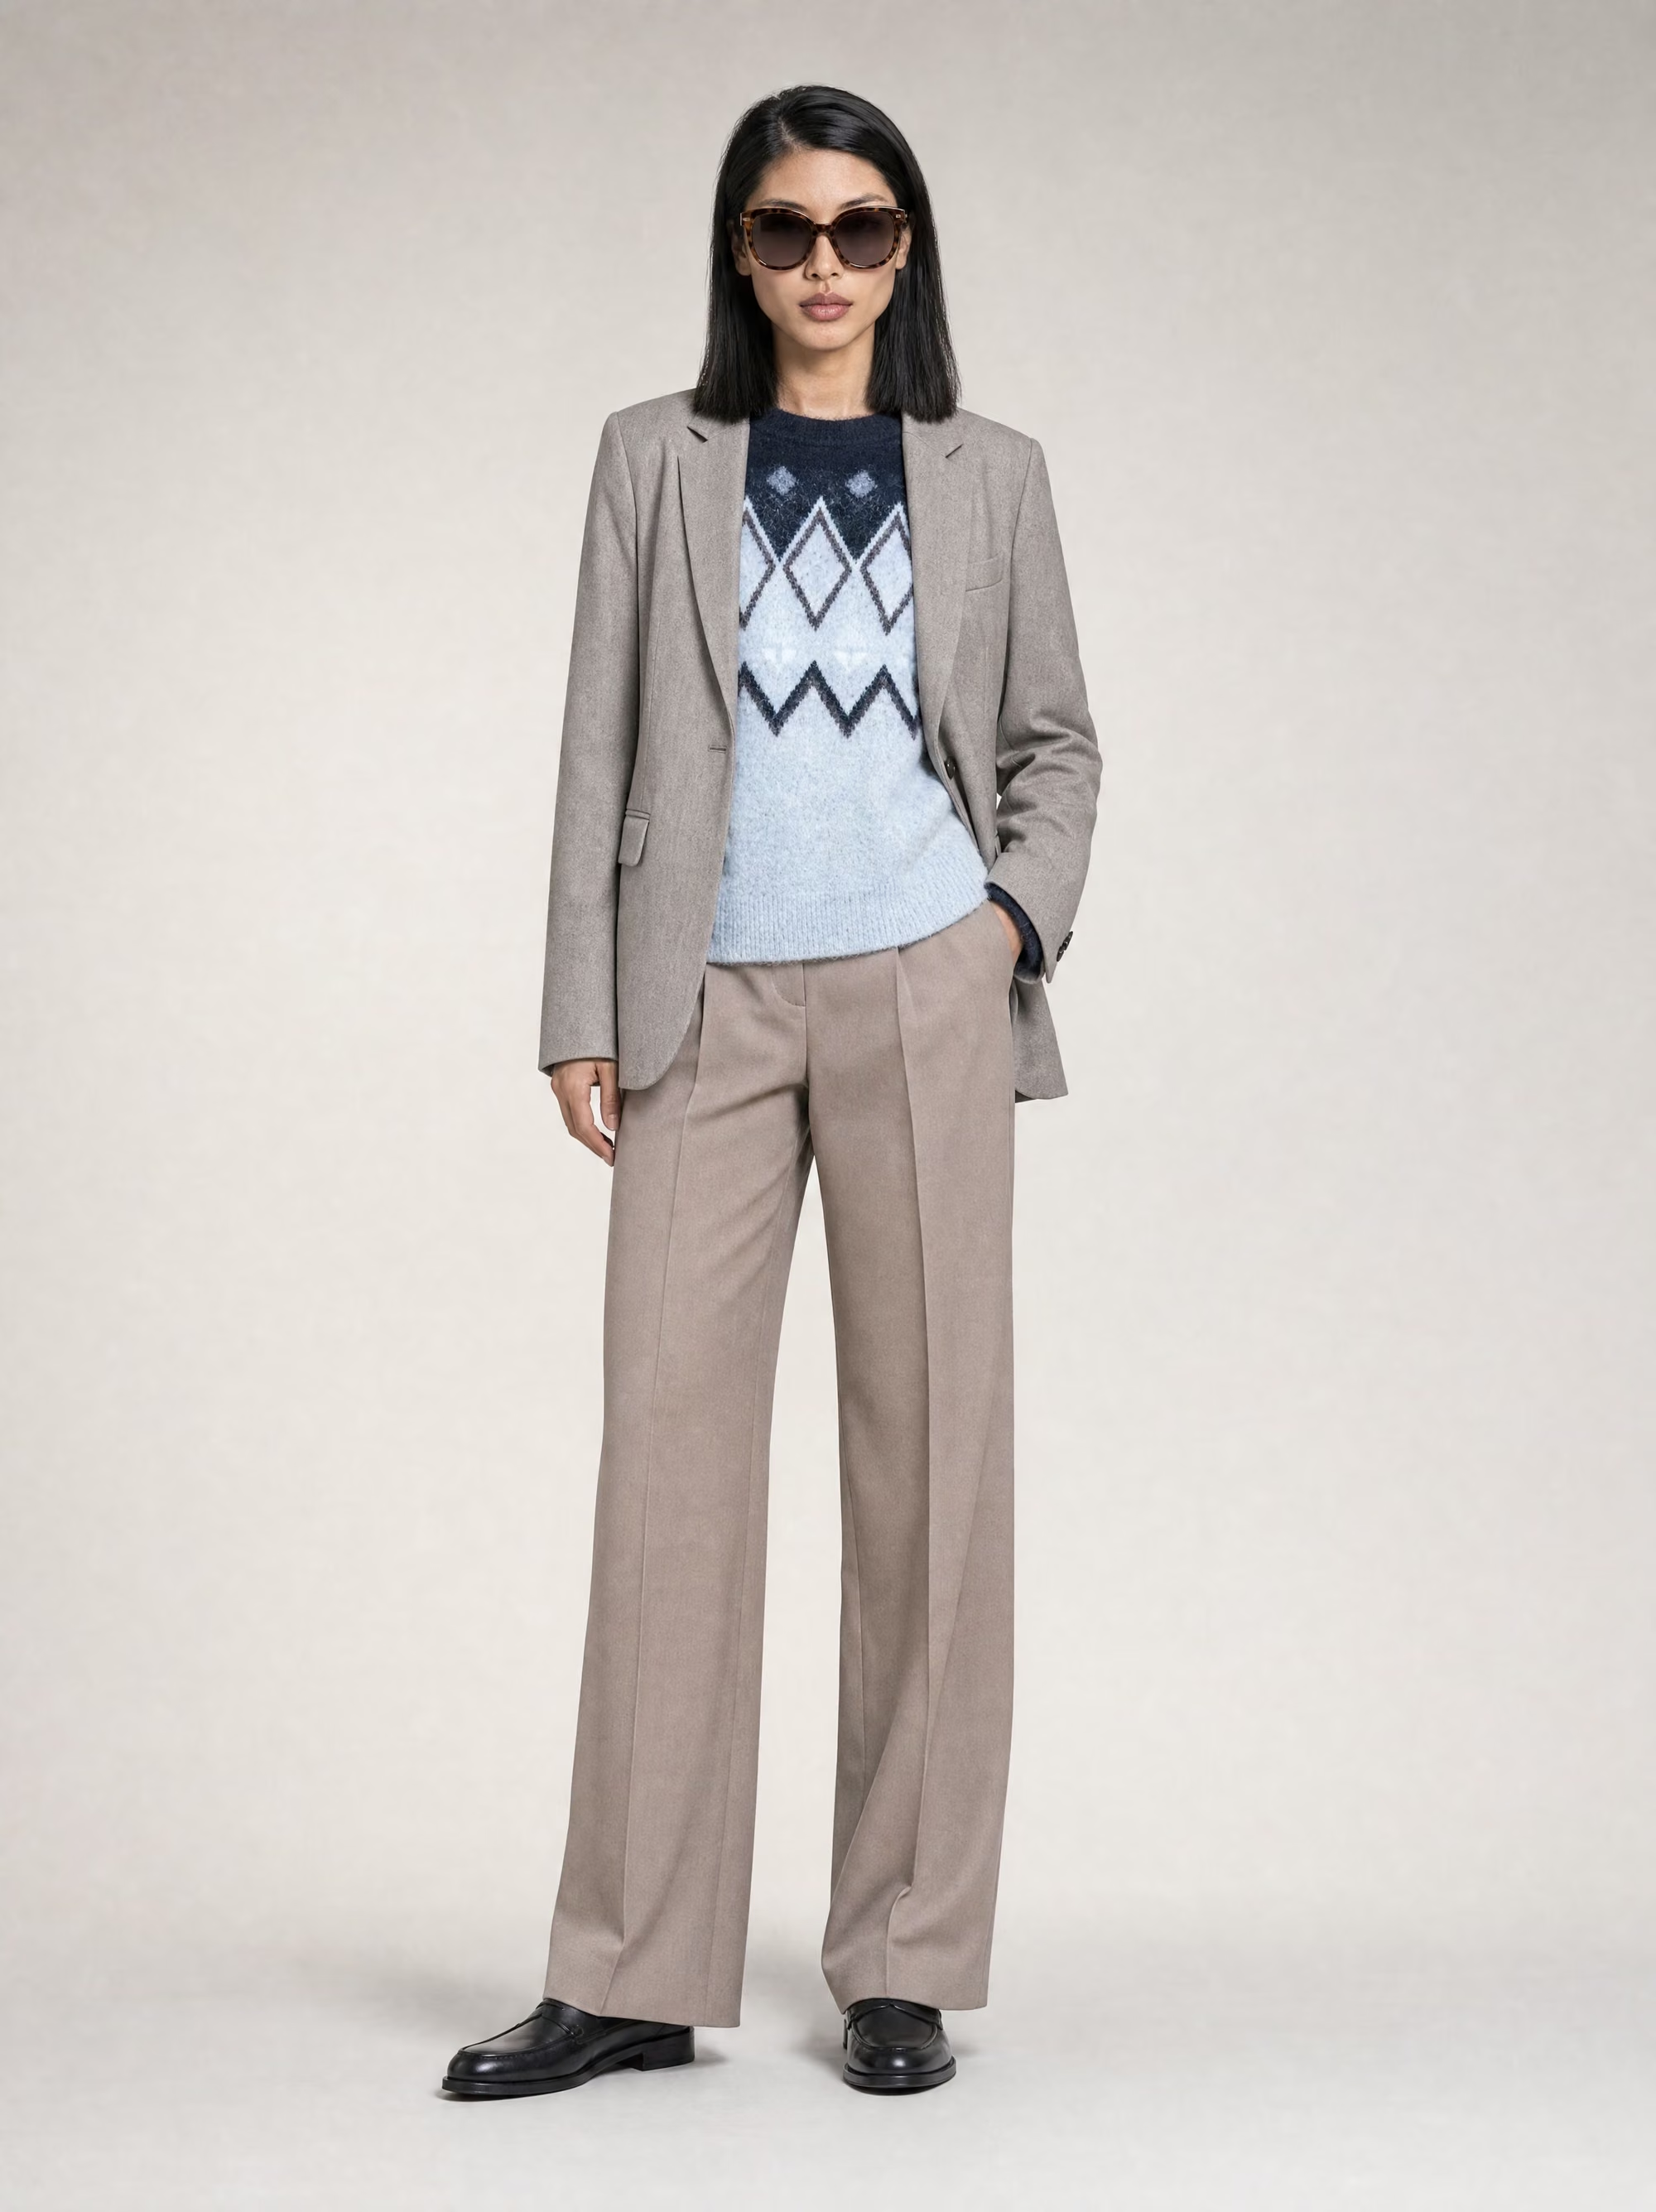
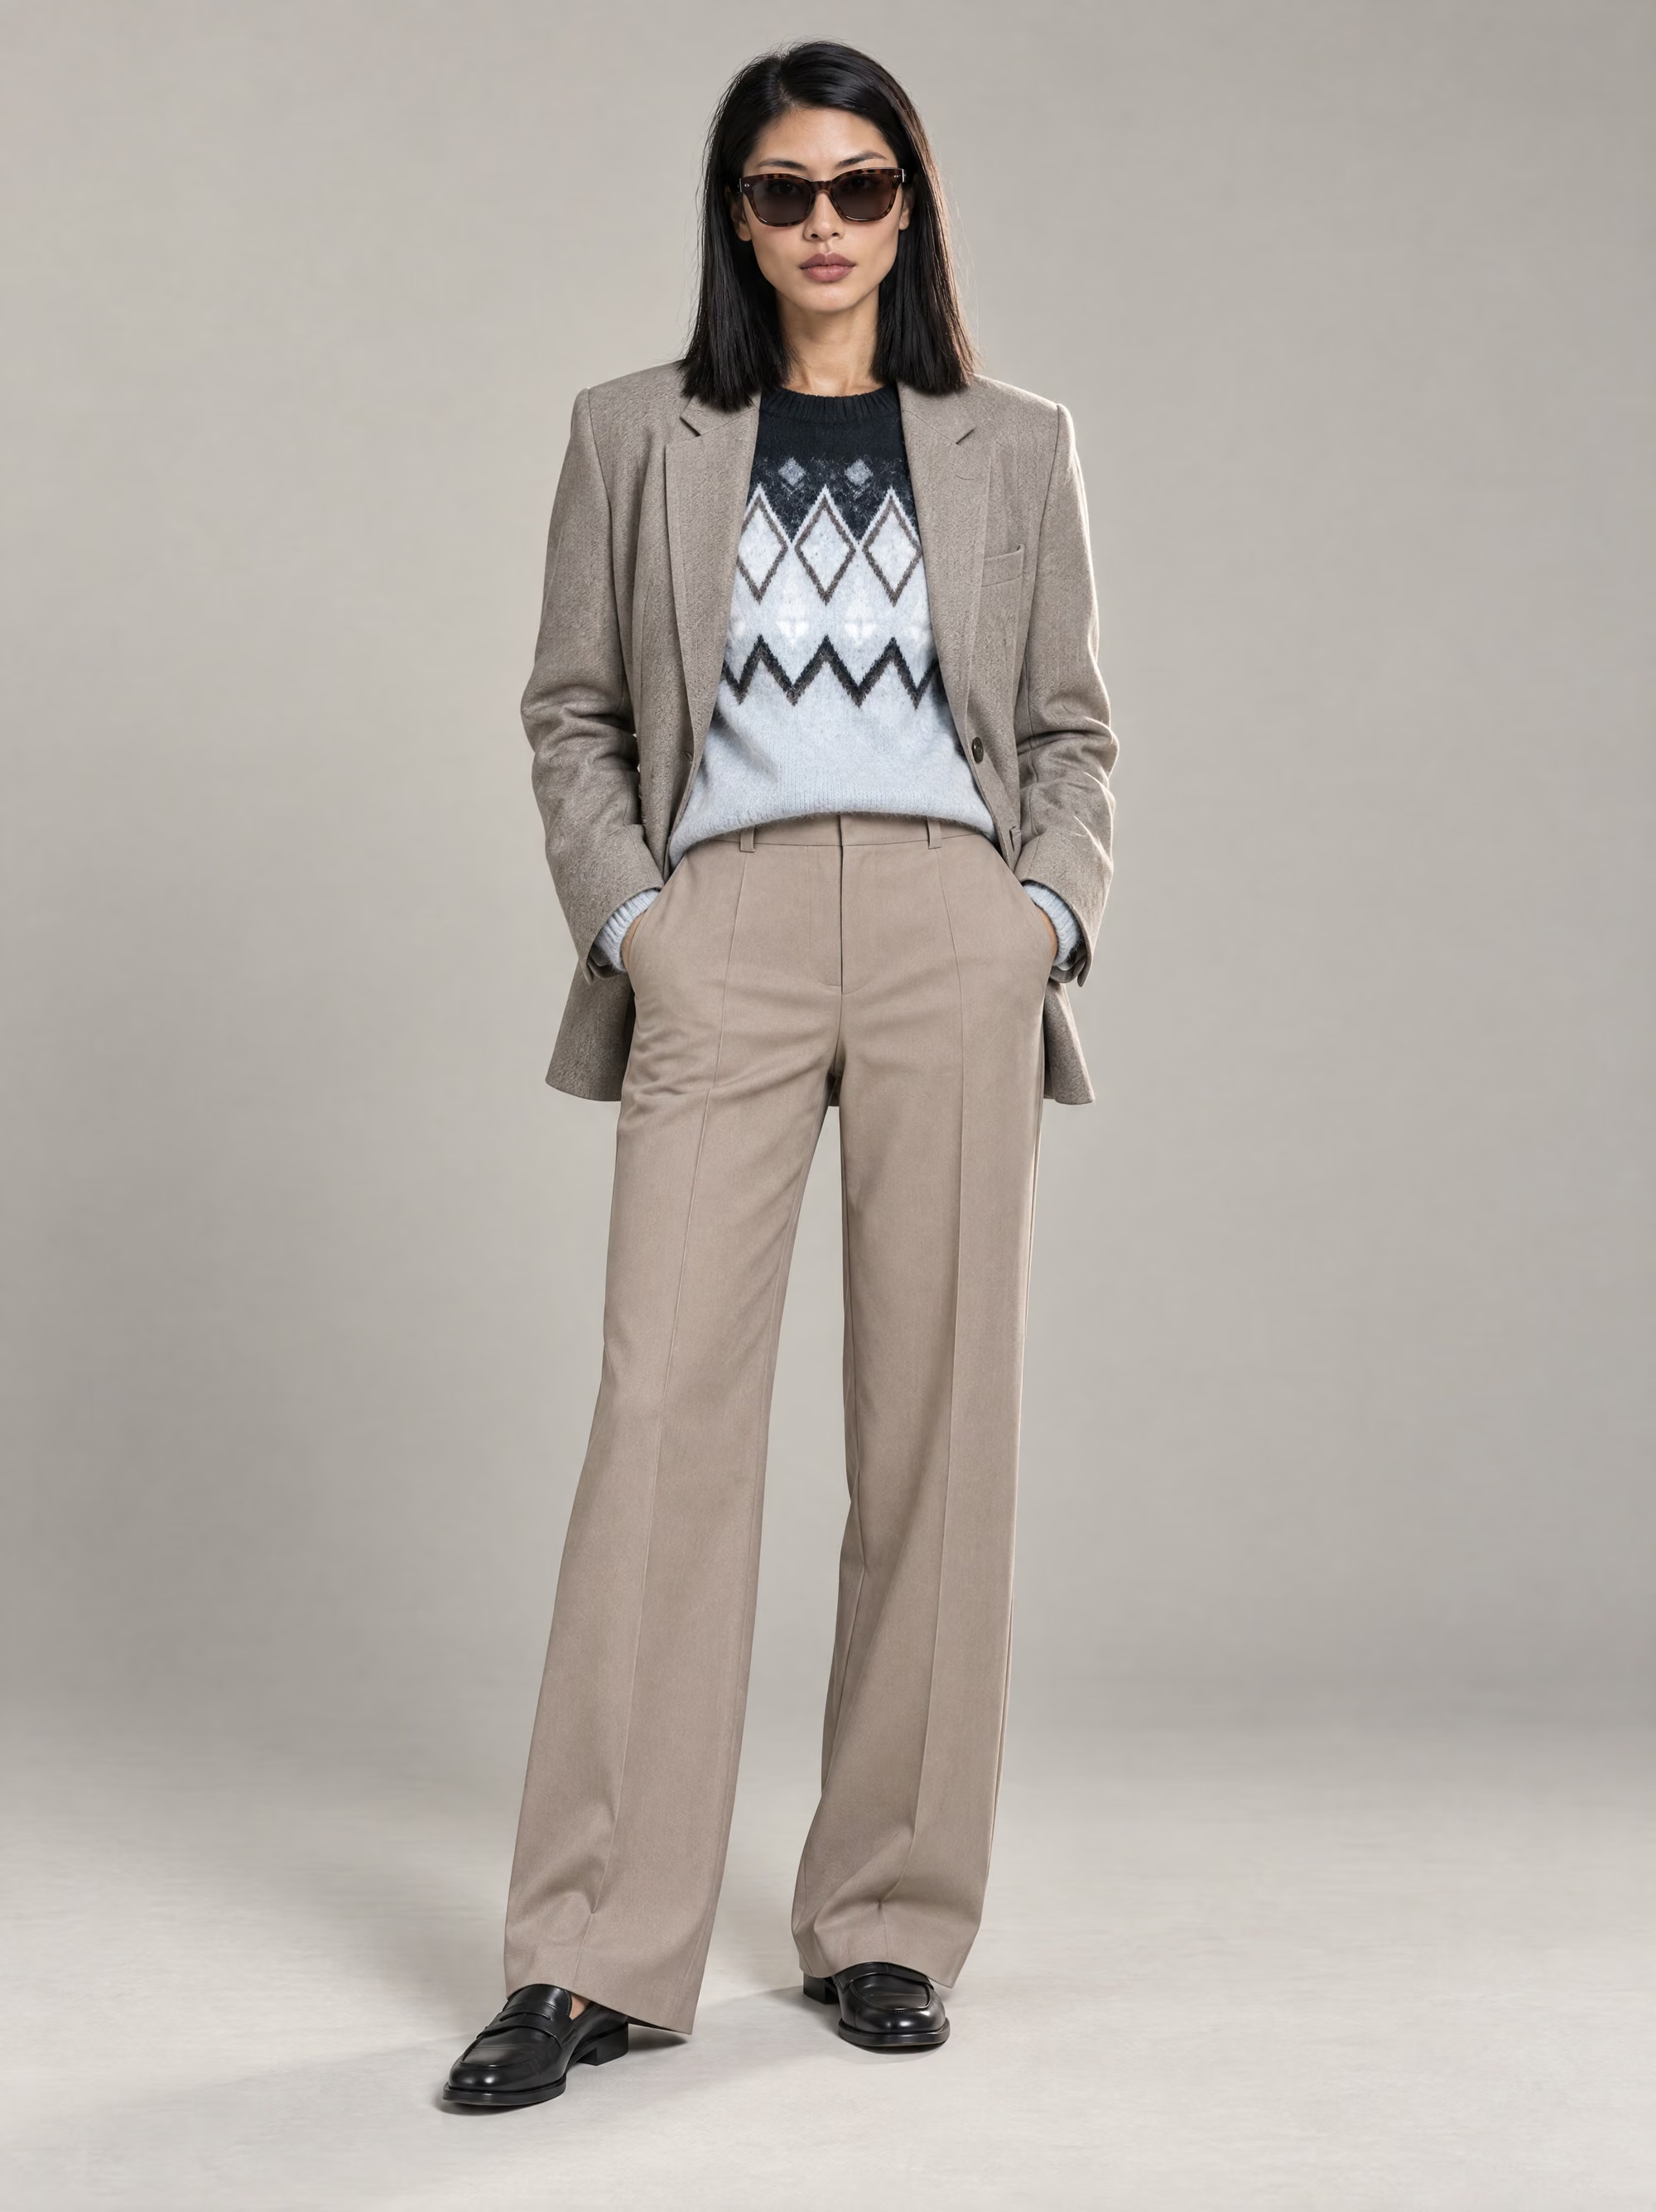 GPT Image 2GPT Image 2.5 Sunburst
| Same job, quality setting High | GPT Image 2 | GPT Image 2.5 Sunburst |
|---|---|---|
| Price per image on Brandmachine | €0.70 | €0.21 |
| Average time per image | 133.3 s | 75.4 s |
| Knit pattern reproduced cleanly | 5 of 5 | 5 of 5 |
| Output size | 2480 x 3312 | 2480 x 3312 |
That is 3.3 times cheaper and 43% less waiting, at the same setting, for the same result on the garment. Across a thousand images, €700 becomes €210.
The pullover row needs one footnote. With the blazer open over it, part of the pattern is hidden. We also ran Sunburst with the blazer removed, which exposes the whole pattern: 4 of 5 renders were clean and one was slightly soft. We did not run GPT Image 2 without the blazer, so the fully exposed comparison only exists for the new model. Section 3 goes into the knit in detail.
Price per setting
GPT Image 2 offered three quality settings. GPT Image 2.5 offers five.
| Setting | GPT Image 2 | GPT Image 2.5 |
|---|---|---|
| Preview (low) | not offered | free |
| Medium | €0.22 | €0.11 |
| High (default) | €0.70 | €0.21 |
| Very high (xhigh) | not offered | €0.32 |
| Maximum (max) | not offered | €0.63 |
The line worth reading twice: the new default setting (€0.21) costs less than the old model's middle setting (€0.22). If you ran GPT Image 2 at Medium to keep costs down, you now get High for the same money.
Time per setting
| Value (s) | GPT Image 2 | GPT Image 2.5 Sunburst |
|---|---|---|
| Preview (low) | 56.4 | 63.5 |
| Medium | 77.5 | 61.6 |
| High (default) | 133.3 | 75.4 |
| Very high | not available | 92.2 |
| Maximum | not available | 115.2 |
Two things stand out. The old model's High was the slowest cell in the entire test. And on the new model, Medium took no longer than Preview, so on this kind of job the step up from the cheapest setting costs nothing in time.
These timings come from launch week, through our inference provider, on one type of job. Expect them to move as capacity settles.
2. Five quality settings, and which one to use
The quality setting is often misunderstood as a resolution knob. It is an effort knob. We asked for specific pixel sizes at every setting and every setting returned exactly the size we asked for. What changes is how much work the model puts into the pixels, and what it costs.
Our recommendation, which the next section backs with images:
| Setting | Use it for | Avoid it for |
|---|---|---|
| Preview | Checking pose, crop, styling and background before you spend money | Any final image with a detailed pattern |
| Medium | Simple garments: a tee with a print, a solid knit, plain trousers | Detailed knits, jacquards and print repeats |
| High (default) | Anything you publish | Nothing we tested |
| Very high, Maximum | Unusually fine detail you want to try harder on | Portraits, and anything High already gets right |
Use High for anything you publish. It had no broken render in the knit and lettering tests, it is the default on Brandmachine, and it is the setting the price and speed comparison above is built on.
Medium is fine for simple garments. On our hardest knit it scored clean in 9 of 10 renders, but on a closer look Felix found smaller issues there too, so we would not trust it with a detailed pattern.
Preview is for composition. It is free on Brandmachine precisely so you can check the pose, the crop and the styling without paying for it. As you will see below, it breaks detailed patterns.
Very high and Maximum are worth trying on unusually fine detail, such as an intricate knit, lace or a very small label. They are not automatically better. In our review a higher setting sometimes over-renders, adding texture that was never in the garment or the brief, and on portraits that can make an image look worse.
One measured detail supports the caution. On the text garments in section 3, we measured edge sharpness over the lettering. The most expensive setting produced the softest text edges on three of the four garments, while costing many times more than the cheapest.
3. Printed text survives everything. Knitwear is the hard case
Text is the failure every customer notices. A brand name with a wrong letter is an unusable image. So we built garments specifically to break it.
Customer product photography usually cannot be published, so we generated our own test garments for an invented brand called KETTLEBROOK. Four garments in total, two printed and two knitted, each in an easier and a harder version. The hard printed one is a white tee with the name on an arched baseline and two smaller lines below it (NORTH SHORE OUTFITTERS and No. 47). The hardest of all is a cream jumper with the name knitted into the weave in cream thread: no printed edge, no contrast, the letters formed only by stitch texture. That kind of tonal jacquard lettering is known to break older models.
We re-photographed each garment as an e-commerce packshot at every one of the five settings, six times each. Then we scored every render blind, without knowing which setting made it, against a crop of the reference photograph at the same scale.
The result: 120 renders, zero malformed characters. KETTLEBROOK was reproduced correctly 120 times, the small lines 60 times each, and the tonal woven version 30 times, at every setting including Preview. Scoring blind, we could not tell the settings apart on the lettering at all. When we repeated the test with the jumper on a model in a full outfit, lettering was correct in 8 of 8 renders at Preview and 8 of 8 at High.
If your product is a graphic tee, the cheapest setting is enough for the lettering. The difficulty lies elsewhere.
The fair-isle pullover
For the hard case we used a real customer garment, a fair-isle pullover: a repeating diamond motif on a colour gradient, thin contrast lines and a fine brushed stitch. The customer has cleared it for publication.
Here is every render of the pullover, scored blind against the reference.
| Engine and setting | Renders | Clean | Soft | Broken |
|---|---|---|---|---|
| GPT Image 2.5, Preview | 10 | 8 | 0 | 2 |
| GPT Image 2.5, Medium | 10 | 9 | 1 | 0 |
| GPT Image 2.5, High | 10 | 9 | 1 | 0 |
| GPT Image 2.5, Very high and Maximum | 20 | 20 | 0 | 0 |
| GPT Image 2, Preview (low) | 5 | 2 | 2 | 1 |
| GPT Image 2, Medium | 5 | 5 | 0 | 0 |
| GPT Image 2, High | 5 | 5 | 0 | 0 |
Every render that broke the pattern outright came from the cheapest setting, on both engines. Across all of them, 5 of 15 Preview renders had a knit defect, against 2 of 50 at every other setting.
Why lettering survives and patterns don't
Our working explanation is priors. A model has seen letterforms billions of times, so it can rebuild KETTLEBROOK correctly even from a reference that does not resolve the individual stitches. It has never seen this particular arrangement of diamonds, so it has to copy it from your photograph, and the cheapest setting does not spend enough effort to copy it faithfully.
The practical rule follows from that. Detail the model could guess, such as lettering, survives a cheap setting. Detail only your photograph defines, such as a specific knit, jacquard or print repeat, needs High.
Two things that make this harder to judge than it looks
The reference photograph matters. The pullover's product photo was 1000 x 1278 pixels, feeding an image of more than 8 megapixels. Some of the finest contrast lines suffer even at the top settings. We cannot cleanly separate how much of the difficulty came from the setting and how much from the small reference, so we do not claim the setting is the only cause. What the test does show is the shape of the problem: thin knitted detail is fragile, it fails visibly at Preview, and it is dependable from High upward. Send the largest product photo you have.
A layered look hides failures. The open blazer covers the shoulders and the sides of the yoke, which is exactly where the pattern is densest and where it breaks.
Zippers, drawcords and a gathered hem: the current frontier
Trims are where GPT Image 2.5 is least predictable. We generated a plain rain jacket with no branding and photographed it on a model in five poses, once with the hem hanging loose and once cinched with its drawcord. It is a demanding brief: a main zipper with a slim pull, two zipped pockets, cords and toggles on the hood and the hem, and a hem that has to gather evenly when it is pulled tight.
Several of the renders get all of it. Others, from the same inputs and at the same setting, slip on one small piece.
These slips did not depend on the quality setting. Extra pocket pulls turned up at High, Very high and Maximum alike. They are small, but a brand checking its own product will spot them straight away. Until the models close this gap, check trims at full size and fix a slip with spot correction in the photo editor.
4. Casting: the prompt finally does what it says
Every on-model image on Brandmachine starts with a fashion model. Brands want models who look like their customers, and a model that returns the same pretty default face with different hair is no help. Casting is the part of this release we are most excited about.
Where we were
We liked REVE a lot, and it was one of the models behind our fashion model casting. The portraits looked good. Getting a specific person out of it was hard. An earlier round of casting research on REVE found that beauty adjectives in a brief produced interchangeable faces, pushing for distinctive features tipped into unflattering ones, and three briefs describing the same demographic with different bone structure came back as one face. REVE 2.1 showed less variety across three different briefs than the previous version had shown within a single brief.
In July, Reve announced an investment from OpenAI and that members of its research team would join OpenAI's multimodal research effort. The REVE models are no longer available to us, so its place in our casting needed filling anyway. GPT Image 2.5 took it.
What changed
We wrote casting briefs around one distinguishing feature each and rendered each brief six times on both GPT Image 2.5 variants. Then we checked, on a zoomed crop, whether the feature was clearly there.
| Feature in the brief | Clearly visible |
|---|---|
| Gap between the upper front teeth | 12 of 12 |
| Widow's peak | 12 of 12 |
| Sharp cupid's bow | 10 of 12 |
| Deep philtrum groove | 9 of 12 |
| One iris paler than the other | 8 of 12 |
| One brow slightly higher than the other | 7 of 12 |
The pattern is clear. A concrete, structural feature (a gap, a hairline shape, freckles, eye spacing) lands almost every time. A relative instruction, where two symmetric things should differ slightly, is close to a coin flip. Brief on the first kind.
One lesson came from our own prompt rather than the model. Our production portrait prompt carried the line "Mood: friendly, approachable, and joyful". It put a broad stock-photo smile on nearly every face. Removing that single line turned the output into editorial portraits.
Thirty models from a brief
With that in place, we cast thirty fashion models: twenty women and ten men, all in their twenties. The briefs came from a deliberate matrix of heritage, face shape, eye shape, hair texture and skin tone, with one structural feature on top of each combination.
27 of the 30 features read clearly, 2 were present but weak, and 1 did not appear at all. The one that failed was the only relative feature in the set: a model briefed with two different eye colours came back with two matching pale blue eyes. The structural features went 29 for 29.
Thirty different people
The failure we were most worried about was the one we had seen before: different briefs collapsing onto the same face. So nine of the thirty briefs were written inside three shared demographic groups on purpose, to give the model every opportunity to repeat itself. An automated similarity check ranked all 435 possible pairs, and we looked closely at the six it ranked closest. The check is rough (its top pair is plainly two different men), so the verdict below is a human one.
No two of the thirty read as the same model.
The set card
Each model on Brandmachine comes with a set card: nine angles and expressions generated from the single portrait, so every later shot has a consistent face to work from. All thirty set cards came back as nine panels with one identity throughout, matching the portrait.
A tip from testing: the panel set decides which features can appear. A model cast for a gap between her front teeth showed it in every portrait and in none of her set cards, because only one of the nine panels has an open mouth and the gap did not read there. If you cast someone for their smile, make sure a shot shows it.
On Brandmachine, a GPT Image 2.5 portrait costs €0.12 and a set card €0.30.
5. Flare or Sunburst
GPT Image 2.5 ships in two variants, Flare and Sunburst. The question was whether they differ enough to matter.
On price, no. They are billed identically at every setting and size we ran. On measured quality, also no: across 72 blind-scored casting portraits, both passed every integrity check and both landed 29 of 36 briefed features.
On speed, it depends on the job. Generating an image from a text description alone, Flare is clearly faster.
| Text only, 1024 x 1024 | Flare | Sunburst |
|---|---|---|
| Preview | 10.6 s | 21.3 s |
| Medium | 12.4 s | 16.9 s |
| High | 21.0 s | 40.2 s |
| Very high | 27.2 s | 51.0 s |
| Maximum | 48.9 s | 100.0 s |
| High, mean of 36 portraits | 21.2 s | 35.4 s |
One render per cell except the last row, so treat the ladder as a direction.
Editing photographs, which is almost everything Brandmachine does, that advantage disappeared in launch week. Composing an outfit onto a model from six reference images at High, the two averaged 105.0 s and 105.1 s. Across 64 further edits Flare was only about 12% faster (89.4 s against 101.8 s).
| Value (s) | Flare | Sunburst |
|---|---|---|
| Text only | 21.2 | 35.4 |
| Outfit edit | 105.0 | 105.1 |
| Other edits | 89.4 | 101.8 |
Flare is the variant pitched as the fast one, so we would not be surprised if its edit speed improves once the launch settles. Right now it does not show up where our customers would feel it.
We default to Sunburst. Its faces looked slightly more natural to us, by a small margin and on judgement rather than a measurement. And in the outfit test it followed the references more literally: given a belt bag shown at the waist, Sunburst put it at the waist, while Flare wore it across the body as a sash on all three models it dressed.
6. Why revisions don't decay
GPT Image 2.5 is marketed with edits that preserve the subject and composition across many rounds of revision. We tested that directly, because it decides how an editing workflow should be built.
We took an on-model photograph and applied eight edits in a row, each one editing the previous result: backdrop, key light, stance, top colour, trouser colour, footwear, backdrop again, camera height. None of the edits touched the face or hair, so any change there is damage rather than an instruction being followed. We ran this on two cast models with both variants. As a control, a second sequence applied the same growing list of changes but re-rendered from the original source images each time.
Every sequence that edited its own previous output degraded. The first three edits looked clean. From the fourth, skin started to mottle, and by the seventh and eighth the faces carried heavy orange-magenta blotching, pushed contrast and a plastic surface. Every control that went back to the source stayed clean through the eighth change. Both sequences followed the instructions equally well. What suffered was the image itself. The damage is also easy to miss at thumbnail size and obvious at full size.
This is why Brandmachine re-renders from your source assets at every step instead of editing the last image. Revise a look eight times and the eighth render is as clean as the first.
7. Smaller findings and technical limits
The same model across a catalogue
A campaign needs the same person to look like the same person in forty shots. Measuring skin tone on the model's face across renders of the same outfit, GPT Image 2 spread about twice as far as Sunburst: a lightness range of 13.9 across 15 renders against 7.8 across 25. For a single product shot that barely matters. For a catalogue shot over weeks, it is the difference between a consistent cast and one that quietly changes.
Resolution and request limits
There is no true 4K. Both GPT Image 2 and GPT Image 2.5 share the same ceiling, and Brandmachine renders on-model images at the largest portrait frame it allows.
| GPT Image 2.5 | |
|---|---|
| Pixel budget per image | 8,294,400 pixels (8.29 MP) |
| Longest edge | 3840 px |
| Largest 3:4 portrait | 2480 x 3312 (8.21 MP) |
| Largest square | 2880 x 2880 |
| Largest 16:9 | 3840 x 2160 |
| Widest aspect ratio | 3:1, the only request that returns an error |
| Edge lengths | multiples of 16, other values are rounded down (1000 becomes 992) |
| Oversized requests | returned at the largest size that fits, with no warning (4096 x 4096 comes back as 2880 x 2880) |
| Named ratios such as "4:3" | return a small frame (1024 x 768), so request exact pixels |
| Quality setting | changes effort, never pixel size |
| Seed | none, so every render is unique and cannot be reproduced exactly |
If you call the model directly, check the pixel size of what comes back. The response does not tell you when you were downscaled.
8. How we tested
Five rounds between 9 and 14 September 2026, about 490 renders in total, run through our inference provider in the model's launch week.
Most experiments ran in two passes. First a single render per condition to check that the setup worked, with no conclusions drawn from it. Then the full set, five or six renders per condition. Scoring criteria were written down before the scored renders started.
Garment and text fidelity were scored blind, without knowing which engine or setting produced a frame, against a crop of the original reference photograph pinned at the same scale. Timings are wall-clock averages per call. Prices are Brandmachine's per-image prices as of September 2026.
The KETTLEBROOK garments and the rain jacket were generated for this test so they can be published. The fair-isle pullover is a customer garment shown with permission. All fashion models are generated and depict no real person.
What this test does not cover: other hard patterns such as stripes, houndstooth or lace; more than one outfit and one model in the quality setting comparison; Flare on product edits; and speed outside launch week. Where a result rests on five renders, or on one render per setting as the zipper test does, we have said so.
Brandmachine builds AI photo production for fashion brands that need a whole catalogue, not a hero shot. On 10 September, GPT Image 2.5 Sunburst replaced GPT Image 2 in Campaign, Product Studio and GroupShot, and replaced REVE among the models we use for casting. If you want to see how it handles your hardest garment, send it to us and we will run it.